Hands-on activities Day 1 Virtual HPC cluster Setup with ROCKS 7.0 - - PDF document

hands on activities day 1 virtual hpc cluster setup with
SMART_READER_LITE
LIVE PREVIEW

Hands-on activities Day 1 Virtual HPC cluster Setup with ROCKS 7.0 - - PDF document

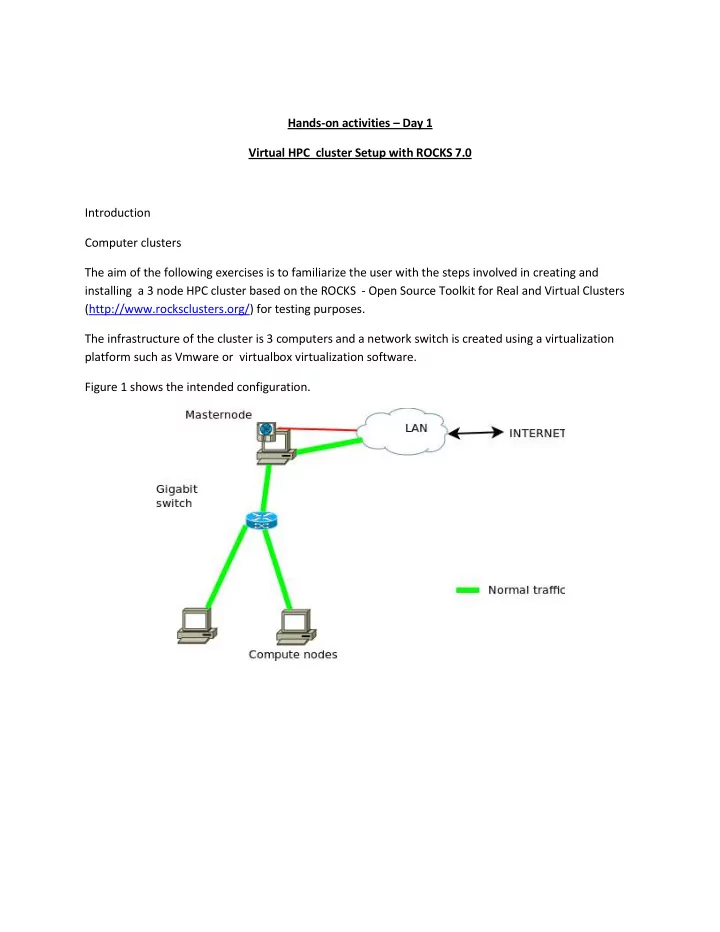
Hands-on activities Day 1 Virtual HPC cluster Setup with ROCKS 7.0 Introduction Computer clusters The aim of the following exercises is to familiarize the user with the steps involved in creating and installing a 3 node HPC cluster based


slide-1
SLIDE 1

Hands-on activities – Day 1 Virtual HPC cluster Setup with ROCKS 7.0 Introduction Computer clusters The aim of the following exercises is to familiarize the user with the steps involved in creating and installing a 3 node HPC cluster based on the ROCKS - Open Source Toolkit for Real and Virtual Clusters (http://www.rocksclusters.org/) for testing purposes. The infrastructure of the cluster is 3 computers and a network switch is created using a virtualization platform such as Vmware or virtualbox virtualization software. Figure 1 shows the intended configuration.

slide-2
SLIDE 2

Activity 1 Familiarization with virtualization tool (vmware or virtualbox) Requirements:

  • Vmware or virtualBox manual in PDF format for consultation

Familiarization steps ฀ Locate the StartMenu or Desktop entry for the Vmware or virtualBox application. ฀ Start the vmware or virtualbox application ฀ Understand the following components/concepts of the interface :

  • Virtual Machine list
  • File/Preference Menu
  • Snapshots
  • Networking mode
  • Creating new machines and networks

Activity 2 Creating a Front-end/cluster Master node Requirements

  • Working installation of virtualizaion platform (Vmware or VirtualBox)
  • ROCKS iso image
  • kernel-7.0-0.x86_64.disk1.iso (for ROCKS 7.0)

Steps

  • Create a new Virtual Machine (VM) with the following characteristics
  • 3GB Ram, 1 CPU, 2 Ethernet devices, 40GB hard-disk
  • IMPORTANT-Notes:

฀ Network configuration as follows: ฀ Adapter 1 (eth0) as follows ฀ For Vmware ฀ Create a custom network named vmnet2 or similar ฀ Disable DHCP assignment ฀ Disable connection to host

  • For VirtualBox

฀ Attached to: an Internal Network ฀ Name: cluster-switch ฀ Adapter 2 (eth1)

slide-3
SLIDE 3
  • Enabled
  • Attached to: NAT

฀ In Settings ฀ Storage

  • Attach the CD device to the local ROCKS iso image (Click

triangle or CD symbol at end of line to open a file browser)

  • For laptops with touchscreen choose “System”

฀ Set Pointing device to “USB Tablet”

  • Close the Settings Window
  • Boot the machine start the installation from the Rocks iso image
  • Select “Install Rocks 7.0” to boot into a GUI
  • Select your desired language and Click Continue
  • Click on “Date & Time”

฀ Click on the approximate location of your city to change to the right timezone. ฀ Click on Done at the upper left-hand corner of screen

  • Scroll to bottom of screen and Click on “Network & HostName”
  • Select “enp0s8” (or second device on list)

฀ Click on “Off” at upper-right corner of screen, it should switch to “On” ฀ Change the hostname to “mycfrontend.local” and click on Apply button ฀ Click on Done at the upper left-hand corner of screen

  • Scroll to top of screen and Click on “CLUSTER PRIVATE NETWORK”
  • Click on Done at the upper left-hand corner of screen
  • Click on “CLUSTER CONFIG”
  • Set Cluster Name to “MYCLUSTER”
  • Set Contact to your e-mail address
  • Set Project URL to your website
  • Set “Certificate Organisation” to the acronym of your organisation
  • Set “Certificate Locality” to your city
  • Set “Certificate State” to your state or region
  • Set “Certificate Country” to the 2 letter code of your country: e.g IT for Italy, GH for

Ghana, NG for Nigeria, BW for Botswana, ZA for South Africa,

  • Click on Done at the upper left-hand corner of screen
  • Click on “ROCKS ROLLS”
  • Click on “List Available Rolls”
  • Once a list appears, Click on the word “Select” to select all Rolls with tick marks
  • Click on “Add Selected Rolls”
  • Click on Done at the upper left-hand corner of screen
  • Scroll to middle of screen and Click “INSTALLATION DESTINATION”
  • Use automatic repartitioning if possible, (note You can free space by deleting/reclaiming

used partitions)

  • Click on Done at the upper left-hand corner of screen
  • Click on “Begin Installation” to start installation
  • Click on “ROOT Password”
slide-4
SLIDE 4
  • Set a suitable root password
  • Click on Done at the upper left-hand corner of screen (You may need to click twice if

your password is not secure enough)

  • DO NOT CREATE A USER HERE AS IT IS NOT ABLE TO LOGIN AFTERWARDS
  • The installation continues..
  • Once completed, Click on “Reboot”
  • On the INITIAL SETUP screen
  • Click on “FINISH CONFIGURATION” at bottom right corner of screen
  • After the server GUI login screen starts, login as root
  • Click Applications --> System Tools --> Settings -> Users to create a new user
  • Follow the GUI and use option set password at next login
  • Click Add
  • Open a Terminal Window and run the command (
  • rocks sync users
  • Logout as root and login as the user.
slide-5
SLIDE 5

Activity 3 Installing the cluster worker/compute nodes Requirements

  • Working installation of Vmware or VirtualBox
  • Virtual Machine (VM) running master/front-end

Steps

  • Create 2 new VMs with the following characteristics
  • 768MB Ram, 1 CPU, 1 Ethernet devices, 30GB hard-disk

฀ (Use 3072MB Ram NOTE: host computer or laptop MUST HAVE at least 6GB RAM or more)

  • IMPORTANT Notes:

฀ BEFORE INSTALL configure adapter 1 as follows: ฀ Adapter 1 (eth0) must match the network created for master-node:

  • For Vmware

฀ Attached to the previously created vmnet2 or similar

  • For VirtualBox (Click “Settings” ฀ “Network”)

฀ Set “Attached to”: Internal Network ฀ Set “Name”: cluster-switch ฀ Using the Advanced options , set “Adapter Type”: “PCnet-Fast III “

  • Also ensure that the right option to enable/connect the

network at boot-time is set. ฀ Additional settings: Ensure the following options are enabled to make the machine always boot from the network

  • Booting from Network

฀ For VirtualBox, this is under “Settings ฀ “System” ฀ “Boot Order”. Make sure Network is first on the list and enabled

  • On the master node, As user root
  • Open a Terminal window and run the command

฀ insert-ethers ฀ From the new menu select “Compute” entry by highlighting it and pressing the Enter key.

  • Now power on the first compute node
  • The node should be captured and wait until it reports kickstart. The installation should start

accordingly.. You can monitor this using the rocks-console command tool

  • Repeat the above for the other node
slide-6
SLIDE 6

Activity 4 Creating users for ROCKS cluster from command-line Requirements

  • Working ROCKS cluster with masternode and at least one compute node (possibly Vmware or

VirtualBox) Steps

  • Open a terminal window or remotely login to the cluster master node using the ssh command
  • Run the following command to become root and type in the password when requested
  • su -
  • Create a new user using the command
  • useradd {new_user_name}
  • Set the password on the new account using the command
  • passwd {new_user_name}
  • Set the full name of the user using the command
  • chfn -f “FirstName Surname” {new_user_name}
  • Repeat the above 3 steps/commands for all new user logins required
  • Notify ROCKS of the new users using the command
  • rocks sync users
slide-7
SLIDE 7

Activity 5 Remote login to ROCKS cluster Requirements

  • Working ROCKS cluster with masternode and at least one compute node (possibly Vmware or

VirtualBox)

  • SSH Client software (command-line client on Linux and OS/X or putty.exe for Windows)

Steps

  • For Linux or OS/X
  • Open a terminal window
  • Run the following command

฀ ssh -l {login_name} [hostname or IP address of cluster master or login node]

  • For Windows platform
  • Download putty.exe from

http://www.chiark.greenend.org.uk/~sgtatham/putty/download.html

  • Start the putty.exe executable

฀ Enter the hostname or ip address of the master or login node in the dialog box provided ฀ Press the “Open” button ฀ Enter the login name ฀ Enter the password

slide-8
SLIDE 8

Activity 6 Checking cluster status ROCKS cluster from command-line Requirements

  • Working ROCKS cluster with masternode and at least one compute node (possibly Vmware or

VirtualBox) Steps

  • Open a terminal window or remotely login to the cluster master node using the ssh command
  • Check the status of compute nodes and jobs using any of the following command
  • qstat -f
  • Alternatively, check the status of the compute nodes using the command
  • qhost
  • Check logged in users using the command
  • who
  • w
  • Checking the on-going activities on master node
  • top

฀ Note: press the number 1 key while in top shows the individual cpus; pressing the letter q exits from top.

slide-9
SLIDE 9

Activity 7 Submitting batch jobs master-node of ROCKS cluster Requirements

  • Working ROCKS cluster with masternode (possibly Vmware or VirtualBox)

Steps ฀ Login as normal user ฀ Create a job script with a suitable editor (vi, emacs, nano or pico) containing the following lines

#!/bin/bash # #$ -cwd #$ -j y #$ -S /bin/bash # date /usr/bin/openssl speed date

Options Explanations

  • cwd

Run in the current working directory

  • j y

Send STDOUT and STDERR to same output file

  • S /bin/bash

Use the bash shell for running the job

  • M {email-address}

Send notifications about job to email-address

  • o {filename}

Send output into file {filename}

  • e {error_filename}

Send stderr into file {error_filename} ฀ Save the file as test.sh ฀ Submit the job using the qsub command

  • qsub test.sh
slide-10
SLIDE 10
  • Note: you can submit the test.sh job multiple times, repeat the qsub command about 5

times ฀ Checking the status of your jobs using the qstat command

  • qstat
  • qstat –f
  • qstat -j {job_identifier}

฀ You can delete one of the jobs using the qdel command

  • qdel {job_identifier}
slide-11
SLIDE 11

Activity 8 Submitting parallel jobs on master-node of ROCKS cluster Requirements

  • Working ROCKS cluster with masternode (possibly Vmware or VirtualBox)

Steps ฀ Login as normal user ฀ Create a job script with a suitable editor (vi, emacs, nano or pico) containing the following lines

#!/bin/bash # #$ -cwd #$ -j y #$ -S /bin/bash #$ -pe mpi 4 # module load rocks-openmpi date mpirun –np $NSLOTS /usr/bin/openssl speed date Options Explanations

  • cwd

Run in the current working directory

  • j y

Send STDOUT and STDERR to same output file

  • S /bin/bash

Use the bash shell for running the job

  • M {email-address}

Send notifications about job to email-address

  • o {filename}

Send output into file {filename}

  • e {error_filename}

Send stderr into file {error_filename}

  • l exclusive

Requests exclusive access or disable sharing of nodes

  • l h_rt=aaaa

Specifies a limit on CPU execution time (aaaa is in seconds)

  • l mem_free=XX{G|M|K}

Specify XX as memory requirements for a job

  • pe mpi XX

Requires the OPENMPI parallel environment (pe) requesting for XX number of cores or cpus

slide-12
SLIDE 12

฀ Save the file as test-mpi.sh ฀ Submit the job using the qsub command

  • qsub test-mpi.sh
  • Note: you can submit the test-mpi.sh job multiple times, repeat the qsub command

about 5 times

  • Note the options may also be specified using the command line

฀ qsub -pe mpi 4 test-mpi.sh ฀ Checking the status of your jobs using the qstat command

  • qstat
  • qstat –f
  • qstat -j {job_identifier}

฀ You can delete one of the jobs using the qdel command

  • qdel {job_identifier}

NOTES: ฀ Within the job script

  • It is important to always load a parallel environment using the module command.
  • The command or application to be executed must be started with mpirun

฀ When submitting the job

  • A parallel environment must be selected.
slide-13
SLIDE 13

Activity 9 Checking status of jobs on master-node of ROCKS cluster Requirements

  • Working ROCKS cluster with masternode (possibly Vmware or VirtualBox)

Steps ฀ Login as normal user ฀ Checking the status of your jobs using the qstat command

  • qstat
  • qstat -f

฀ Checking status of jobs for a single user

  • qstat -u login_name

฀ Checking status of jobs for all users

  • qstat -u \*

฀ Checking detailed status of single job (or job in error state)

  • qstat -j {job_identifier}

฀ A user can delete his/her owned jobs using the qdel command

  • qdel {job_identifier}
  • NOTE: IN CASE of errors, the super user (root) may forcibly delete a job belonging to
  • ther users.
slide-14
SLIDE 14

Activity 10 Installing manually compiled applications on ROCKS cluster Requirements

  • Working ROCKS cluster with masternode (possibly Vmware or VirtualBox)
  • Module file implementation

Steps ฀ Login as normal user ฀ Down the tar file for the application

  • wget http://some-download-site/location/specific_file.tgz

฀ Extract the tar file

  • tar –zxvf specific_file.tgz

฀ Change directory to the extracted package

  • cd specific_name-version_num/
  • Examine the INSTALL file for details on the process and options
  • Examine the README file if necessary

฀ Configure the application , make sure the prefix is specified

  • If necessary load necessary modules such as rocks-openmpi using the module command
  • ./configure –prefix=/share/apps/specific_name/version_num … other_options

฀ Compile the application

  • make

฀ Create the directory for installation as user root and give ownership to your user-id

  • su -
  • mkdir –p /share/apps/specific_name/version_num
  • chown my_user_id /share/apps/specific_name/version_num

฀ Carry out the installation

  • make install
slide-15
SLIDE 15

฀ Finally change ownership back to root

  • chown –R root /share/apps/specific_name/version_num

฀ Finally create a module file for the package under /share/apps/modulefile/

  • Optionally (one time only steps)

฀ Create a login shell configuration script for bash and sh ฀ nano /etc/profile.d/zz_share_modulefiles.sh

  • Add the following 2 lines

MODULEPATH=”${MODULEPATH}:/share/apps/modulefiles” Export MODULEPATH ฀ Save the file ฀ Create a login shell configuration script for csh and tcsh ฀ nano /etc/profile.d/zz_share_modulefiles.csh

  • Add the following line

setenv MODULEPATH “$MODULEPATH:/share/apps/modulefiles” ฀ Save the file ฀ Add the new profile.d files for propagation via the 411 service ฀ cd /var/411 ฀ nano Files.mk

  • Add the following lines

FILES += /etc/profile.d/zz_share_modulefiles.sh FILES += /etc/profile.d/zz_share_modulefiles.csh ฀ Save the file

  • Place module config files in sub-directories with the arrangement

฀ specific_name/version_num ฀ That is /etc/modulefiles/specific_name/version_num

slide-16
SLIDE 16

Activity: System Admin task Changing external IP address for master-node of ROCKS cluster Requirements

  • Working ROCKS cluster with masternode (possibly Vmware or VirtualBox)

Steps

  • Open a terminal window or remotely login to the cluster master node using the ssh command
  • Run the following command to become root and type in the password when requested
  • su -
  • Inform ROCKS of the new IP address
  • rocks set host interface ip frontend iface=eth1 ip={new_public_ip_address}
  • rocks set attr Kickstart_PublicAddress {new_public_ip_address}
  • rocks set attr Kickstart_PublicNetwork {new_public_ip_network}
  • rocks set attr Kickstart_PublicBroadcast {new_pubic_ip_broadcast}
  • rocks set attr Kickstart_PublicGateway {new_public_ip_gateway}
  • rocks set attr Kickstart_PublicNetmask {new_public_ip_netmask}
  • Change the network configuration
  • Edit and make changes in the following files:

฀ /etc/sysconfig/network-settings/ifcfg-eth1 ฀ /etc/sysconfig/network ฀ /etc/sysconfig/static-routes ฀ /etc/yum.repos.d/rocks-local.repo

  • Inform rocks of the changes
  • rocks sync config
  • rocks sync host network
  • Reboot the server
  • Note: It may be necessary to repeat the last 2 commands after a reboot.