Gynecology Office Procedures 1. Cervical or endometrial polyp - - PDF document

gynecology office procedures
SMART_READER_LITE
LIVE PREVIEW

Gynecology Office Procedures 1. Cervical or endometrial polyp - - PDF document

Overview Part 1: Gynecology Office Procedures 1. Cervical or endometrial polyp removal 2. IUD removal 3. Endometrial biopsy Part 2: 1. Pessary placement 2. IUD insertion Copper T, LNG IUDs Jody Steinauer, MD, MAS Part 3:


slide-1
SLIDE 1

Gynecology Office Procedures

Jody Steinauer, MD, MAS

  • Dept. Ob/Gyn & Reproductive Sciences

Overview

  • Part 1:

1. Cervical or endometrial polyp removal 2. IUD removal 3. Endometrial biopsy

  • Part 2:

1. Pessary placement 2. IUD insertion— Copper T, LNG IUDs

  • Part 3:

1. Progestin implant insertion and removal 2. Manual uterine aspiration with cervical dilation

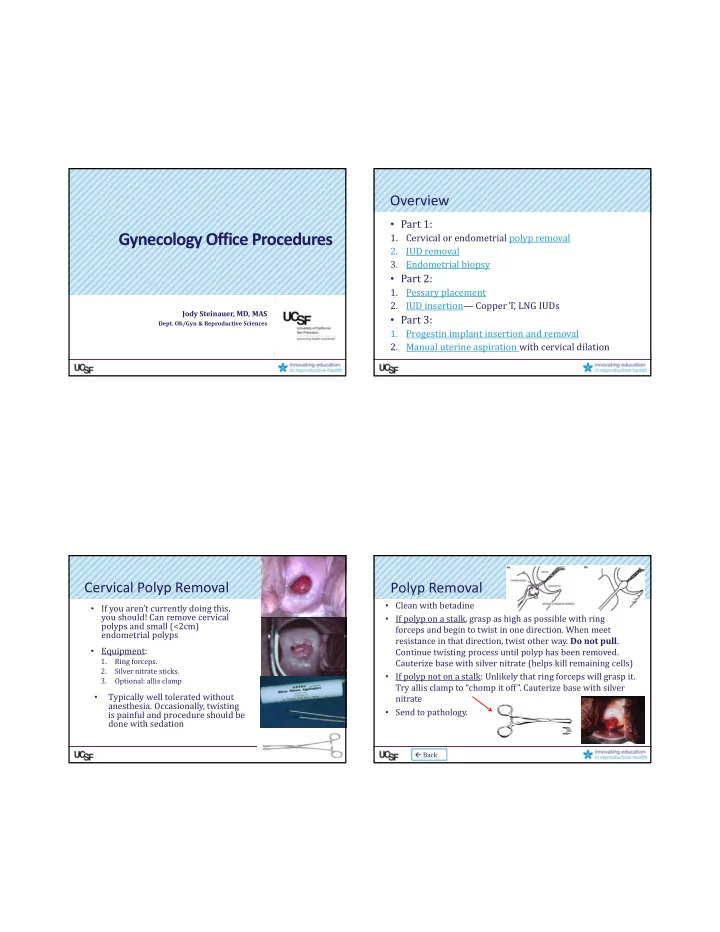
Cervical Polyp Removal

  • If you aren’t currently doing this,

you should! Can remove cervical polyps and small (<2cm) endometrial polyps

  • Equipment:

1. Ring forceps. 2. Silver nitrate sticks. 3. Optional: allis clamp

  • Typically well tolerated without
  • anesthesia. Occasionally, twisting

is painful and procedure should be done with sedation

Polyp Removal

  • Clean with betadine
  • If polyp on a stalk, grasp as high as possible with ring

forceps and begin to twist in one direction. When meet resistance in that direction, twist other way. Do not pull. Continue twisting process until polyp has been removed. Cauterize base with silver nitrate (helps kill remaining cells)

  • If polyp not on a stalk: Unlikely that ring forceps will grasp it.

Try allis clamp to “chomp it off”. Cauterize base with silver nitrate

  • Send to pathology.

 Back

slide-2
SLIDE 2

IUD Removal

  • If you aren’t currently doing this, you should.
  • No training necessary!
  • Most important: offer other form of reliable

contraception, if desired.

  • Equipment:
  • Ring forceps.
  • Cytology brush.

IUD Removal

  • If strings visible, ask pt. to cough and pull quickly
  • n strings as she coughs (this helps with the

visceral feeling pt will have you remove it).

  • If strings not visible: try to tease them out by

twisting cytology brush within the endocervix.

  • Complications: none that I know of. String can

break off or if IUD embedded you won’t be able to remove it. Occasionally it hurts to remove (usually not).

Copper T Removal

 Back 00:40

Endometrial Biopsy

Supplies: 1. Ibuprofen (Pre‐procedure) 2. EMB pipelle 3. 1% lidocaine for 12:00 cervix tenaculum site 4. Tenaculum 5. Fox swabs/ silver nitrate for hemostasis

slide-3
SLIDE 3

Endometrial Biopsy

1. BME to check size, position of uterus 2. Clean cervix with betadine 3. Attempt passing pipelle without using tenaculum. Place pipelle just inside os, she bears down while you push. If it “pops” through the internal os, get your sample as noted below. If it doesn’t pass, you’ll need tenaculum. 4. Always give lidocaine at tenaculum site. Good evidence that it decreases pain of the procedure. 2‐3 cc 1% lidocaine to 12:00 anterior cervix to get a 1 cm white bleb (I like 22 gauge, 4 in spinal needle). Have her cough. 5. Tenaculum: 1 cm wide bite, slowly close. 6. Pull firmly back on tenaculum as you push pipelle through os. Tenaculum should move about 2 cm.

Block for Tenaculum Placement Endometrial Biopsy

7. Once pipelle passes or “pops” through the internal os, push it gently up to fundus and then back it away from fundus by about 1 cm. Do not push hard against the fundus. Do not repeatedly touch the

  • fundus. Touching fundus=painful.

8. Obtain suction by pulling the stylette all the way back 9. Move the pipelle up and down within the uterus (below the fundus) while twisting. Count to 10 out loud. Remove pipelle at 10 seconds.

  • 10. Carefully plunge specimen into specimen cup without touching the

pipelle to the formalin or sides of cup.

  • 11. Check specimen adequacy by shaking formalin and looking for tissue

pieces.

  • 12. If adequate and uterus gritty: done. If not gritty or inadequate: do

another pass.

EMB Tricks

  • Ibuprofen when hits the door.
  • Help her with breathing. No breath holding.
  • Count to 10? Gives her control and a time frame. Tell

her you’ll count to 10 during the biopsy and will stop at 10 (and do so!). If need to do another pass, ask permission— I’ve never had anyone say no (they don’t want to go through this again if insufficient sample!)

  • If she can’t tolerate, STOP. Offer another visit with

ativan, or procedure under sedation, or ultrasound if post‐ menopausal (no evidence that intrauterine lidocaine is helpful)

slide-4
SLIDE 4

EMB Tricks

  • If trouble passing pipelle, use different vectors of

traction on the tenaculum (up, down, right, left).

  • If still can’t pass it and she can tolerate, paracervical

block can relax os (~6‐8 cc 1% lido or chloroprocaine at 4:00

and 8:00 vag ‐ cervical junction). Can also try os finder,

small dilators or ultrasound guidance.

  • If known to be anxious or if attempt and fail, give

ativan for next attempt (if pt willing). Works wonders.

  • If known to be atrophic or if fail to place, try again (if

patient willing) after giving misoprostol 400 mcg buccal or vaginal, 30‐60 min prior

EMB Interpretation & Next Steps

  • “Secretory endometrium”?

– Ovulation has occurred. Rules out anovulation. Likely anatomic lesion.

  • “ Proliferative endometrium”?

– Unopposed estrogen effect. Either anovulatory bleeding or first half of cycle.

  • If premenopause: treat as for anovulation (hormonal

methods).

  • If post‐menopause, give progestin to prevent endometrial

hyperplasia.

  • “Plasma cells”?

– Chronic endometritis: treat with Doxy or Clinda for 2 wks

EMB Interpretation & Next Steps

  • “Proliferative with stromal breakdown and

karyorrhexis” ‐‐‐>

Classic for anovulation. Prolonged unopposed estrogen

  • effect. Treat as above for proliferative.
  • “Benign endocervical cells, no endometrium.” ‐‐>

Non‐diagnostic. Could be atrophy but without endometrium, can’t r/o neoplasia. – If post‐menopausal: Ultrasound to check endometrial

  • thickness. If >=5 mm, needs repeat attempt at sampling

(EMB vs D&C). – If pre‐menopausal: Repeat EMB. Consider misoprostol pre‐treatment (400mcg buccal or vaginal)

EMB Interpretation & Next Steps

  • “Benign superficial fragmented endometrium. No

intact glands or stroma. No hyperplasia or

  • carcinoma. Suboptimal for evaluation”

Either atrophy or insufficient sample.

– If atrophy suspected clinically: do not re‐sample. Observe or add vaginal premarin if vaginal sx. If bleeding persists/recurs‐‐> Ultrasound (if post‐meno). D&C if continued bleeding – If atrophy NOT suspected clinically: Post‐meno: U/S. Pre‐meno: resample

slide-5
SLIDE 5

EMB Interpretation & Next Steps

  • “Simple hyperplasia”

– 1% chance of progression to carcinoma. – Treat with progestin (Mirena is best). Rebiopsy 3‐6

  • months. Follow closely.
  • “Simple hyperplasia with atypia”

– Atypia is most important risk indicator for cancer progression. – 8% chance of progression to Ca. – Progestin (prefer IUD) or hysterectomy (esp if difficult to follow or biopsies difficult or not tolerated.) Biopsy q3‐6 mos until 2 normal.

EMB Interpretation & Next Steps

  • Complex, atypical hyperplasia

– 27% chance of progression to Ca. – And, 30‐50% already have co‐existing carcinoma. – Recommend hysterectomy. If declines, do D&C to rule‐out coexisting carcinoma. High dose progestin (oral or IUD.) Biopsy q3‐6 months until 3 normal. Failure to revert to normal by 9 mos is assoc with progression.

Return  Back

Pessary Placement

Ring with support For prolapse plus incontinence: Incontinence dish with support Incontinence Ring with knob

Start with these 3 types. Get multiple sizes and keep in office. If these don’t work, refer

Pessary Insertion

Test correct size: 1. Have her valsalva—shouldn’t come out 2. Walk around—shouldn’t feel it 3. Urinate—should be able to F/u in 2 wks and 4 wks for careful vaginal exam to ensure no vaginal ulcerations

Fold it like taco and slide it in vagina. When you feel it reach top of vagina, use your index finger to tilt it up behind the pubic symphysis

slide-6
SLIDE 6

Incontinence Ring: Note the knob presses on the urethra

  • If post‐menopausal: always start premarin cream

twice weekly one month prior to placement and continue while uses pessary (to prevent ulceration)

  • Placement is trial and error.

Tilting it up behind the symphysis

Removal

  • Can be tough to remove:
  • Hook finger under ring,

change angle to dislodge it from under symphysis, then pull out.

  • Teach self removal and

insertion at subsequent visit.

  • If unable to do, see her q

6‐8 wks for removal, wash, reinsert.

 Back

IUD Insertion: Copper vs LNG

  • Both require tenaculum
  • Sounding recommended before insertion

– I use plastic emb pipelle

  • Levonorgestrel can be placed without sterile gloves
  • Copper has to be loaded sterilely

Copper T IUD Insertion Supplies

  • Ibuprofen pre‐procedure
  • IUD
  • Sterile gloves to load IUD
  • Speculum
  • Betadine swabs
  • 1% lidocaine for 12:00 tenaculum site
  • EMB pipelle (to sound)
  • Tenaculum
  • Long, sharp scissors to cut strings

TCu 380A

slide-7
SLIDE 7
  • 1. Prepare
  • Get all supplies set up (don’t forget scissors, don’t
  • pen the IUD yet)
  • Prepare the patient:

– BME to check uterine position and size – Betadine to cervix – 2‐3 cc 1% lidocaine to 12:00 anterior cervix to get a 1 cm white bleb (I like 22 gauge spinal needle). Have her cough. – Tenaculum: 1 cm wide bite, slowly close. YES, you must use a tenaculum! Teneculum straightens out the endometrial canal. Without it, increased chance of perforation or of placing IUD below the fundus.

  • 2. Sound the uterus
  • I prefer EMB pipelle to metal sound (disposable,

less likely to perforate with it)

  • Why sound?
  • 1. Measure depth of the uterus

(use this to set the blue “depth gauge” on the device

  • 2. Check its position (retro, mid, anteflexed)
  • 3. Most important: to ensure that the IUD will pass

through the cervix (so you don’t waste an IUD).

CopperT Insertion

  • 3. Load the Copper T

1. Fully peel back package so IUD is sitting on top. 2. Put on sterile gloves. 3. Place the white plunger rod in the clear insertion tube‐ use care

not to plunge the IUD out the top of the tube!

4. Push ends of the arms of the T downward into the insertion

  • tube. Hold the white plunger in

place while you do this.

slide-8
SLIDE 8
  • 4. Advance IUD into Uterus
  • Gently advance the loaded IUD into the

uterine cavity.

  • STOP when the blue depth‐gauge comes in

contact with the cervix or when you reach fundus (light resistance is felt)

  • 5. Release Arms of Copper T

Hold the tenaculum and white plunger rod stationary, while partially withdrawing the insertion tube. This releases the arms of the Copper T.

Arms are down when inside inserter. Withdrawing tube while holding inserter still allows arms to pop up and out. Unlike Mirena, this is done at fundus b/c arms swing lateral and up.

  • 6. Gently push insertion tube to position

IUD at fundus

  • Gently push the insertion tube up until you feel a

slight resistance.

  • Hold the white plunger rod stationary
  • This step ensures placement high in the uterus
  • 7. Withdraw Inserter
  • Gently and slowly withdraw the inserter tube and

white insertion rod from the cervical canal until strings can be seen protruding from the cervical

  • pening.
  • Carefully trim strings to 3 cm using long scissors (short

scissors can get caught on strings and pull out IUD)

Return

slide-9
SLIDE 9

Copper T Insertion

:14 to :41

LNG IUS Insertion Supplies

  • Ibuprofen pre‐procedure
  • IUD
  • Sterile gloves to load IUD
  • Speculum
  • Betadine swabs
  • 1% lidocaine for 12:00 tenaculum site
  • EMB pipelle (to sound)
  • Tenaculum
  • Long, sharp scissors to cut strings
  • 1. Measure the uterus with EMB

pipelle

sound IUD Insertion tube Use EMB pipelle instead

  • 2. Pull on the nylon strings until the arms
  • f the IUD are inside the insertion tube

Position blue flange at the sounded length

slide-10
SLIDE 10
  • 3. Position the flange to the length as

measured by the sound

  • 4. Insert the IUD and tube until the

flange is 1‐2 cm from cervical os

Alternatively: Push IUD up to fundus then withdraw 1.5 cm

  • 5. Release IUD arms by pulling back on the blue

tab to the white marker Count to 10 to allow arms to fully extend

Arms are up while inside inserter. Pulling back blue tab releases the arms so they are initially straight up and then open laterally. Need space for this to occur which is why you need to be 1‐2 cm below the fundus.

  • 6. Push the IUD to the fundus (flange

at the os).

The device has “memory” and if it has been inside the inserter too long, the arms tend to stay upright instead

  • f bending laterally.

Counting to 10 gives time for them to bend laterally and stay that way (prevents inadvertent removal of device as you withdraw inserter)

slide-11
SLIDE 11
  • 7. Release the IUD by pulling the blue tab

all the way back

  • 8. Withdraw inserter and cut strings to 3cm

with long scissors

Return

LNG IUD (5‐year approval) Insertion

New LNG IUD Insertion Supplies

  • Ibuprofen pre‐procedure
  • IUD
  • Sterile gloves to

load IUD

  • Speculum
  • Betadine swabs
  • 1% lidocaine for 12:00 tenaculum site
  • EMB pipelle (to sound)
  • Tenaculum
  • Long, sharp scissors to cut strings
slide-12
SLIDE 12

New LNG Insertion

  • 1. Measure the uterus with EMB

pipelle

sound IUD Insertion tube Use EMB pipelle instead

  • 2. Open package 1/3 of the way, release the

threads and place the rode into the insertion tube

  • 3. Holding the insertion tube and the rod firmly

where the tube meets the rode –pull the strings with the other hand to pull the IUD in

slide-13
SLIDE 13
  • 4. Maintaining a firm pinch on the tube and rod,

move the flange so that it aligns with the sounded depth

  • 5. Pinch and hold the lower end of the tube

where it meets the rod. The top of the rod should be touching the IUD.

  • 6. Advanced the loaded IUD tube through the canal.

Stop when the flange is about 1.5 to 2 cm from the cervix.

  • 7. Holding the rod still pull the tube to the second

indent on the rod. Wait 15 seconds. Then advance the tube and the rod to the fundus.

slide-14
SLIDE 14
  • 7. Holding the rod still pull the tube over the rod all the way

to the ring on the rod. This releases the IUD. Hold the rod still, remove the tube entirely, then remove the rod.

  • 8. Cut strings to 3cm with long scissors

Return

New LNG IUD Insertion and Summary Video

 Back

Implant Insertion Supplies

  • Betadine swabs
  • Local anesthetic
  • Implant
  • Steri‐strips
  • Bandage
  • Gauze for arm
slide-15
SLIDE 15

Implant Insertion

Implant Removal Supplies

  • Betadine swabs
  • Local anesthetic
  • Scalpel
  • Sterile gloves
  • Mosquito clamps
  • Steri‐strips
  • Bandage
  • Gauze for arm
  • (Ultrasound)

Implant Localization

  • If unable to palpate the implant prior to

removal, do not attempt removal

  • Localize with ultrasound or MRI
  • Consider referral to local expert for removal
  • Attempt removal only after localization

and depth have been confirmed by ultrasound/MRI

  • Implanon™ is not radiopaque and cannot be

located by x‐ray or computed tomographic scan, but Nexplanon can.

  • Rule out allergies, anesthetize the

arm (i.e. with 0.5 to 1 cc 1% lidocaine) at the site where the incision will be made (near the tip

  • f the implant that is closest to the

elbow)

  • Be sure to inject the local anesthetic

under the implant to keep the implant close to the skin surface

Implant Removal

60 .

slide-16
SLIDE 16

Implant Removal

  • Implant ultrasound characteristics

–Sharp acoustic shadow below the implant in the transverse position –Implant is a small echogenic spot (2 mm) when viewed in transverse position

  • Consider conducting difficult/deep

removals with ultrasound guidance

Ultrasound Localization

63

Properly Inserted Implant Transverse Image

slide-17
SLIDE 17

Implant Below the Fascia Muscularis Implant Deep in M. Biceps Radiopaque Implant Localization on X‐ray Deep Placement Into Biceps Muscle

68

slide-18
SLIDE 18

Implant Removal Tips

  • Only attempt removal if you have localized it

– Identify radiologist who can identify it on u/s – Obtain u/s in your clinic – Can also obtain etonogestrel level if not radio‐opaque

  • Can often feel it in subq tissue – takes practice but

can remove it if you can feel it

– Fine mosquito clamps are key

  • Identify referral center for deep removals

– It takes special expertise if below the muscle fascia

 Back

Uterine Aspiration

  • Safe way of removing uterine contents
  • Can be used for endometrial biopsy, early

pregnancy loss, abortion, and management of septic abortion

  • Highly effective
  • Can be done in outpatient / ED setting
  • There is generally no need to do sharp curettage

after

Uterine Aspiration Supplies

  • Betadine
  • Local anesthetic
  • Dilators
  • Manual uterine aspiration equipment
  • Ultrasound (optional)

First‐Trimester Uterine Aspiration

slide-19
SLIDE 19

First‐Trimester Uterine Aspiration