create presentation record desktop using mdr
play

Create presentation: Record desktop using MDR You can record your - PDF document

Create presentation: Record desktop using MDR You can record your desktop and upload the recording to Mediasite. However, you must install Mediasite Desktop Recorder (MDR) first. If MDR is not available on your machine, you will be prompted to


  1. Create presentation: Record desktop using MDR You can record your desktop and upload the recording to Mediasite. However, you must install Mediasite Desktop Recorder (MDR) first. If MDR is not available on your machine, you will be prompted to download it. NOTE: If you have questions, contact your Mediasite administrator for more information at mediasite@uconn.edu. To create a presentation by recording your desktop: 1. Start Mediasite Desktop Recorder from your workstation then go to step 7. -OR- Log into My Mediasite using the following link: https://mediasite.dl.uconn.edu/mediasite/mymediasite. Click Create Presentation . 2. Click Record Desktop . 3. Enter a name and description (optional). If you don’t enter a name it will be called Unnamed Recording . 4. Click Launch Desktop Recorder . You may receive a prompt message. Click Allow . 5. A new presentation is created. If MDR has already been installed on your desktop, it launches automatically. Otherwise you will be prompted to install it. 6. In MDR, you will see a Recording request confirmation message, click Accept . 
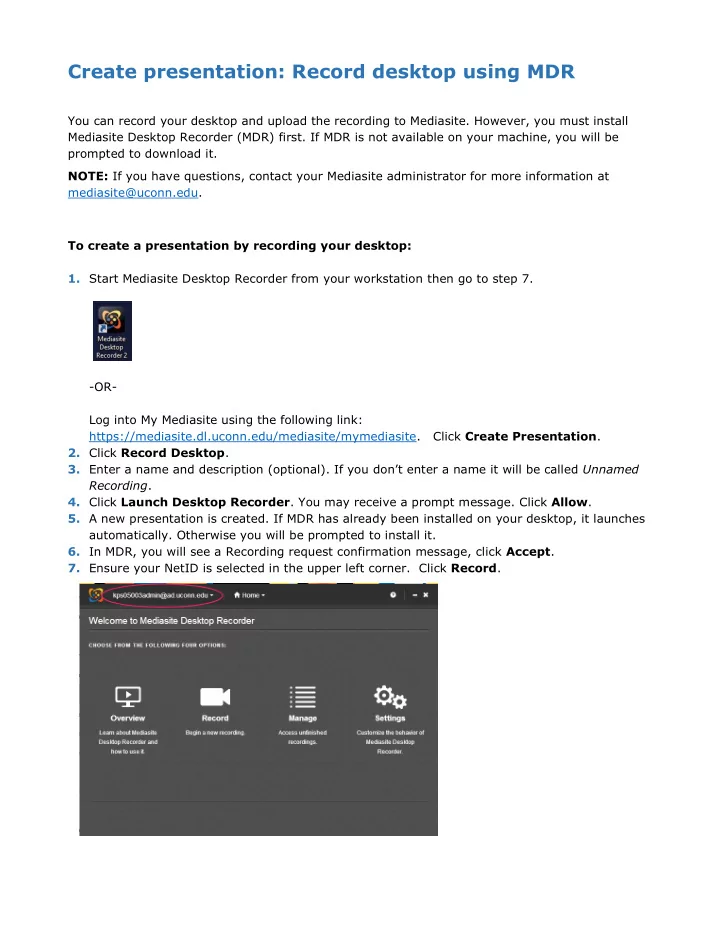
7. Ensure your NetID is selected in the upper left corner. Click Record .

  2. 2 8. Enter a name for the presentation if you haven’t already . 9. Select the type of recording you want to create: a. Slideshow + Video (Slides from desktop and video from a camera with audio from microphone) b. Slideshow + Audio (Slides from desktop with audio from microphone) c. Screencast + Video (Full-motion video of desktop with slides extracted and video from a camera with audio from microphone) d. Screencast + Audio (Full-motion video of desktop with slides extracted and audio from microphone) 10. Click Next . 11. Check that you have the correct microphone selected, check the levels and check video. 12. If everything looks good, click Next . 13. Select the Desktop or Region for the recording then click the green check mark. 14. Show recording control panel option (MDR Preview used to control the recording). If you only have one screen turn this option off. If you have another screen you can move it out of the recording area. If you turn it off you can pause the recording at any time by clicking the icon in the System Tray or press CTRL + F8 on your keyboard.

  3. 3 15. Click Record . You will have 5 seconds before recording begins. 16. Record your presentation. 17. Press Pause in the MDR Preview window, the icon in the System Tray or press CTRL + F8 on your keyboard to pause the recording. 18. Press Finish Recording when it is complete. 19. Once the recording process is completed, the recording is automatically uploaded and processed on the Mediasite server. Mediasite automatically sets the presentation’s status to Private which means only you can view it. 20. To update th e presentation’s visibility settings, log into My Mediasite , click Edit . Select Viewable in the Visibility drop-down list to allow others to view the presentation in Mediasite Player. Which users can view it will depend on the presentation’s security setti ngs. 21. Click Share to obtain the link to the recording so you can email/share it with others to view the recording. We can create a Channel for you so you don’t need to send a link for every recording (if you plan to have many recordings for a class). FAQ: What does the “This presentation has been scheduled” icon mean? 1. You scheduled a Hardware Recording. Once the presentation records, it will be processed and uploaded to your MyMediasite Portal. 2. You created a placeholder for a presentation but have not created the recording. For instance, this may mean you clicked Create Presentation > Upload Media, but chose to save and upload later. Additionally, you may have clicked Create Presentation > Record, but closed out of the Summary tab before recording with the Desktop Recorder. In either case, you've created the frame for your presentation and need to add the media. To add your presentation media, click the icon to open your placeholder frame. At this point you have three options: 1. Create a new recording using the Desktop Recorder. To do so, click the Record New Video button to launch the Desktop Recorder. See Upload a Mediasite Recording to a Scheduled Presentation for details. 2. Upload a presentation recorded using an alternative production source. 3. Upload a presentation you previously recorded using the Desktop Recorder.

Download Presentation
Download Policy: The content available on the website is offered to you 'AS IS' for your personal information and use only. It cannot be commercialized, licensed, or distributed on other websites without prior consent from the author. To download a presentation, simply click this link. If you encounter any difficulties during the download process, it's possible that the publisher has removed the file from their server.

Recommend


More recommend