Challenge Key Concepts Options References Playing position and - - PowerPoint PPT Presentation

challenge key concepts options references playing
SMART_READER_LITE
LIVE PREVIEW

Challenge Key Concepts Options References Playing position and - - PowerPoint PPT Presentation

Teaching Younger Horn Players 2011 Southeast Horn Workshop Appalachian State University Presenter: James Boldin, Assistant Professor, The University of Louisiana at Monroe Challenge Key Concepts Options References Playing position and


slide-1
SLIDE 1

Teaching Younger Horn Players 2011 Southeast Horn Workshop

Appalachian State University Presenter: James Boldin, Assistant Professor, The University of Louisiana at Monroe

Challenge Key Concepts Options References

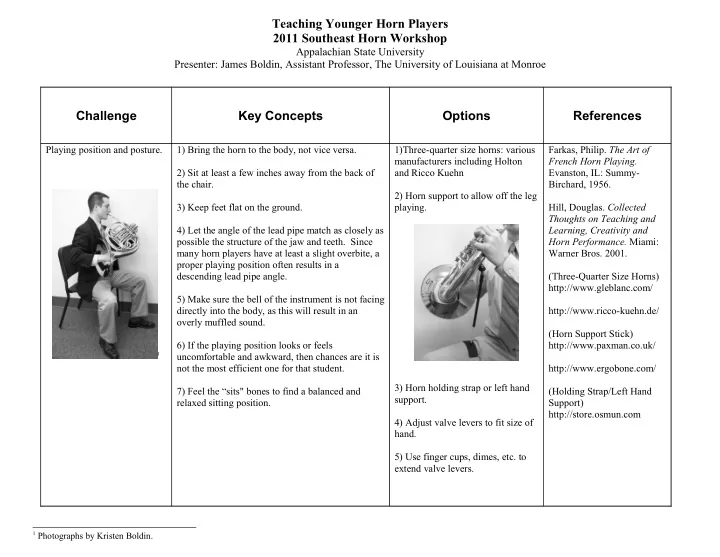
Playing position and posture.

1

1) Bring the horn to the body, not vice versa. 2) Sit at least a few inches away from the back of the chair. 3) Keep feet flat on the ground. 4) Let the angle of the lead pipe match as closely as possible the structure of the jaw and teeth. Since many horn players have at least a slight overbite, a proper playing position often results in a descending lead pipe angle. 5) Make sure the bell of the instrument is not facing directly into the body, as this will result in an

  • verly muffled sound.

6) If the playing position looks or feels uncomfortable and awkward, then chances are it is not the most efficient one for that student. 7) Feel the “sits" bones to find a balanced and relaxed sitting position. 1)Three-quarter size horns: various manufacturers including Holton and Ricco Kuehn 2) Horn support to allow off the leg playing. 3) Horn holding strap or left hand support. 4) Adjust valve levers to fit size of hand. 5) Use finger cups, dimes, etc. to extend valve levers. Farkas, Philip. The Art of French Horn Playing. Evanston, IL: Summy- Birchard, 1956. Hill, Douglas. Collected Thoughts on Teaching and Learning, Creativity and Horn Performance. Miami: Warner Bros. 2001. (Three-Quarter Size Horns) http://www.gleblanc.com/ http://www.ricco-kuehn.de/ (Horn Support Stick) http://www.paxman.co.uk/ http://www.ergobone.com/ (Holding Strap/Left Hand Support) http://store.osmun.com

1 Photographs by Kristen Boldin.

slide-2
SLIDE 2

Challenge Key Concepts Options References

Breathing 1) At the beginner and intermediate level, focus

  • n a sensation and a few useful images rather

than detailed physiological explanations. 2) Balloon imagery: As a balloon fills with air, it naturally expands without needing to be forced out, and as it expels air it naturally

  • contracts. Another helpful image is a bellows.

3) Feel the sensation of air rushing across the bottom of the mouth. 4) Thinking round syllables on the inhale such as "how," "hoh," or "hah" help to keep the throat and oral cavity open. (As opposed to syllables such as "hee" ) 5) The sensation of a relaxed breath is similar to an open-mouthed yawn. 6) Remember that playing with good air support does not necessarily require a tight or tensed stomach and abdomen. There are numerous types of breathing exercises, including those developed by Arnold Jacobs, Douglas Hill, Verne Reynolds, and Sam Pilafian. If practiced regularly, breathing exercises can help increase efficiency in playing and help develop tone, range, and endurance. Breathing exercises ought to be practiced as a precursor to warming up on the instrument, or as a relaxation exercise. Numerous possibilities exist for incorporating breathing exercises into an ensemble format, both as a warm- up routine and as a relaxation technique prior to performances. Feel free to create your own variations on well known breathing regimens, as well as to create wholly

  • riginal exercises.

The following contain excellent information on breathing as well as detailed breathing exercises. Farkas, Philip. The Art of Brass Playing. Rochester, NY: Wind Music, Inc. 1962. Hill, Douglas. Warm-ups and Maintenance Sessions for the Horn Player. Eau Claire, WI: Really Good Music, 2004. Pilafian, Sam and Patrick

  • Sheridan. The Breathing
  • Gym. Fort Wayne, IN: Focus
  • n Excellence, 2002.

(Includes DVD and 32 page guide) Reynolds, Verne. The Horn

  • Handbook. Portland, OR:

Amadeus Press, 1997. Vining, David. The Breathing Blog. http://mountainpeakmusic.w

  • rdpress.com/

2

slide-3
SLIDE 3

Challenge Key Concepts Options References

Embouchure 1) One of the main purposes of the embouchure is to allow for the formation of an aperture. The function of the aperture is to vibrate in response to air. 2) Philip Farkas describes a properly formed horn embouchure as a “puckered” smile— with neither too much lip in the mouthpiece (pucker) nor too little (smile). 3) Both firm corners and a flat chin are usually key physical features of a well-formed embouchure. 4) Especially at the beginner level, work to identify and eliminate any air pockets that may form behind the upper or lower lip or in the cheek area. The flesh of both the upper and lower lip should rest against the teeth, with no air behind. 1) Saying the words “emm” while pointing the chin towards the ground can be effective in forming a working embouchure. 2) Feel the lower teeth firmly behind the lower lip—avoid letting the flesh just below the lower lip bunch up. 3) Practice free buzzing as an aid to embouchure formation—if you can produce a decent free buzz, then you are forming a basically correct embouchure. 4) A common problem that becomes apparent when young students attempt to free buzz is a lack of chin control—the chin and lower lip have a tendency to bunch and creep up. One way to assist in producing a free buzz is to place the index finger directly on the lower lip and chin, holding it in position. Muscular development and control will gradually replace the need for the index finger. 5) To initiate a free buzz, imagine spitting a hair off the end of the tongue, or spitting out a seed. Clevenger, Dale. “Basics for Beginning Horn Students.” The Instrumentalist 51, no. 8 (March 1997): 34, 36, 38, 40, 42. Ericson, John. Introducing the Horn: Essentials for New Hornists and Their

  • Teachers. Tempe, AZ:

Horn Notes Edition, 2010. Farkas, Philip. The Art of Brass Playing. Rochester, NY: Wind Music, Inc. 1962. Farkas, Philip. The Art of French Horn Playing. Evanston, IL: Summy- Birchard, 1956. Hill, Douglas. Collected Thoughts on Teaching and Learning, Creativity and Horn Performance. Miami: Warner Bros. 2001. Robinson, William C. “The Beginning Horn Embouchure-Pitfalls, Problems, and Progress.” The Instrumentalist 22, no. 4 (Nov. 1967): 68.

3

slide-4
SLIDE 4

Challenge Key Concepts Options References

Mouthpiece Placement 1) The age old prescription of two-thirds upper lip and one-third lower lip generally works, although there are exceptions. Jaw and lip structure also play a very significant role in the specific placement for a player. 2) For players with thin to medium lips, lining up the bottom of the mouthpiece with the lower outside edge of the bottom lip can help in finding a correct embouchure placement. 3) For players with thick or full lips, the bottom of the mouthpiece may not need to rest on the outside edge of the lower lip, but somewhere above it. 4) It is important that the angle of the mouthpiece follow the natural contour of the player’s face. Since many people have at least a slight overbite, this results in a descending angle. Players with even bites or under bites will tend to have straight to slightly ascending mouthpiece angles. 5) Moist lips are important in finding a comfortable and workable mouthpiece

  • position. Moistening the lips allows the

mouthpiece to settle into a comfortable place and can help keep the embouchure from sticking during wide slurs. 6) Many young players end up with too little top lip in the mouthpiece, often making it difficult to produce higher pitches or a characteristic tone on the instrument. 1) To find the proper proportion of upper to lower lip, first lightly moisten the lips and form the embouchure described in the previous

  • discussion. Allow the mound of flesh
  • n the upper lip to rest just inside the

mouthpiece rim. 2) Think of the lower lip as an anchor point for the mouthpiece, while the upper lip acts as a hook for the upper two-thirds or so of the mouthpiece. 3) Consistent practice with a mirror

  • n the stand is very important for

beginners, until the embouchure muscles become accustomed to a regular mouthpiece position. 4) A good test of mouthpiece placement is being able to produce a fairly loud, “buzzy” buzz. A buzzy buzz on the mouthpiece is one produced by lots of air, and one in which the buzz sounds free and open, rather than tight and constricted. Ericson, John. “Embouchure 101” and “Embouchure 201,”

Horn Articles Online. <http://www.public.asu.edu/~jqerics/ Kopprasch_zone.htm>.

Farkas, Philip. The Art of Brass

  • Playing. Rochester, NY: Wind

Music, Inc. 1962. Farkas, Philip. The Art of French Horn Playing. Evanston, IL: Summy-Birchard, 1956. Hill, Douglas. Collected Thoughts

  • n Teaching and Learning,

Creativity and Horn

  • Performance. Miami: Warner
  • Bros. 2001.

Matlick, Eldon. “Solving Horn Mysteries.” The Instrumentalist 48, no. 9 (April 1994): 34-49. Perrini, Nicholas. “Basics for Beginning French Horn Students.” The Instrumentalist 24,

  • no. 7 (Feb. 1970): 64.

4

slide-5
SLIDE 5

Challenge Key Concepts Options References

Right Hand Position 1) Along with embouchure formation, mouthpiece placement, and breath control, right hand position is important in producing a characteristic sound on the

  • horn. An improper position can affect tone quality,

articulation, and intonation. 2) Many younger horn players play with their hand too far into the bell, or with an overly covered hand position. 3) Ideally, the right hand should be considered an extension of the instrument, allowing for flexibility in tone quality and intonation. 4) Hand positions vary among professionals, but some general characteristics of good right hand position are: a) fingers bent at the knuckle and fairly straight from the knuckle to the tips of the fingers b) thumb close against the side or top of the index finger, with no spaces between c) no spaces between fingers d) palm of hand slightly cupped, as if swimming the freestyle or holding shampoo 1) Allow the right hand to conform to the shape and size of the bell—this will result in a slightly rounded shape when the back of the hand is pressed against the far right side of the bell. 2) Line up the knuckle of your thumb with the bell brace, and then insert the right hand until the thumb touches the upper part of the bell and the bottom edge of the hand makes contact with the bell. 3) Avoid the temptation to curl the fingers inside the bell or to splay them

  • ut.

4) Keeping the right elbow well away from the side of the body helps maintain an open hand position that will not muffle or otherwise obstruct the sound. Farkas, Philip. The Art of French Horn Playing. Evanston, IL: Summy- Birchard, 1956. Hill, Douglas. Collected Thoughts on Teaching and Learning, Creativity and Horn Performance. Miami: Warner Bros. 2001. Smith, Christopher M.

“Misunderstood Basics of

Horn Playing Among Even Advanced Students.” The Instrumentalist 56, no. 8 (March 2002): 36, 38-40.

5

slide-6
SLIDE 6

Challenge Key Concepts Options References

Producing a characteristic tone quality Assuming that a player is breathing properly and has a well formed embouchure, an individually correct mouthpiece placement, and a proper right hand position, a characteristic tone has: 1) A full and resonant sound, which projects more than just a few feet. 2) Ease and openness—most easily demonstrated in the middle register and at a comfortable dynamic level. 3) A distinct core, without air or crackling around the edges. Although concepts of bright and dark can be subjective, a characteristic horn sound is not brittle or piercing, nor is it diffuse and unfocused. Most of these issues can be addressed by reexamining embouchure formation, mouthpiece placement, breathing, and right hand position. 1) Providing beginners with examples of characteristic horn sounds is very important, and much easier today with the availability of solo and orchestral recordings in Mp3 format. 2) Imagine blowing the air through every bend and coil in the horn, all the way into the right hand. 3) Try to make the entire room vibrate, no matter what size it is. Make the room as well as the horn the instrument. 4) Feel the vibration of the sound in the nasal cavity, as if humming. 5) Imagine the sound as a continuous stream of liquid flowing out of the bell and to a listener’s ear. Numerous solo recordings available on amazon.com, iTunes, etc. Ericson, John. “Striving for Tone,” Horn Articles Online. http://www.public.asu.edu/~jqer ics/Striving%20for%20Tone %202003.pdf Farkas, Philip. The Art of Brass Playing. Rochester, NY: Wind Music, Inc. 1962. Farkas, Philip. The Art of French Horn Playing. Evanston, IL: Summy-Birchard, 1956. Hill, Douglas. Collected Thoughts on Teaching and Learning, Creativity and Horn

  • Performance. Miami: Warner
  • Bros. 2001.

Matlick, Eldon. “Teaching Horn Tone.” The Instrumentalist 42,

  • no. 10 (May 1988): 40.

6

slide-7
SLIDE 7

Challenge Key Concepts Options References

Braces (possible complications include playing discomfort, loss of range and endurance, lack of dynamic contrast, unfocused sound, frustration and discouragement, etc.) 1) These effects are not permanent! 2) Work slowly but consistently, remaining focused on producing a characteristic sound in the middle range. 3) Avoid excessive mouthpiece pressure as an aid to producing higher pitches. 4) Work towards a relaxed and open aperture in the middle register, as a precursor to high range development. 5) In the middle and upper registers, allow more mouthpiece pressure on the bottom lip, while relaxing pressure on the top lip to allow it freedom to vibrate. 6) Think of the bottom lip as an anchor. 1) Brace guards to relieve

  • discomfort. Avoid wax, as it can get

blown into the horn. 2) Use a mouthpiece with a wide, flat rim to more evenly distribute pressure and allow greater playing comfort.

2

3) Practice middle register long tones at a comfortable dynamic range. 4) Practice slow, slurred scales in the middle register. 5) Incorporate mouthpiece buzzing into daily practice. (Brace Guards) http://www.dentakit.com/brguli ppr.html (Mouthpieces) http://www.hornmouthpiece.co m/ http://www.osmun.com (for specific information on the Neill Sanders rim, follow this link http://store.osmun.com/browse. cfm/osmun-neill-sanders- rim/4,2218.html (Articles) Laudermilch, Kenneth. "Coping with Braces on Brass Students." The Instrumentalist 48, no. 4 (November 1993): 46-53. Ericson, John. "Suggested Horns, Mouthpieces, and Mutes." Horn Articles Online. <http://www.public.asu.edu/~j qerics/sug_hnmp.htm>. Morehead, Twanette. “Dentures, Braces, Overlays, and Brass.” The Instrumentalist 36, no. 8 (Mar. 1982): 38.

2 Comparison of normal mouthpiece rim (right) with Neill Sanders rim (left) Image obtained from Thomas Greer, Moosewood Hornists' Requisites,

<http://www.hornmouthpiece.com/>. 7

slide-8
SLIDE 8

James Boldin is an Assistant Professor in the School of Visual and Performing Arts at the University of Louisiana at Monroe, where he teaches applied horn and music history. He holds degrees from Appalachian State University and the University of Wisconsin-Madison. This presentation is based on his article "Teaching Young Hornists," in The Instrumentalist 65, no. 2 (Sept. 2010): 40-42. For more information on this and other horn-related topics, visit his blog at http://hornworld.wordpress.com.

8