homebrew buddipole plans richard warner af5aq
play

Homebrew Buddipole Plans Richard Warner AF5AQ Before I start on the - PDF document

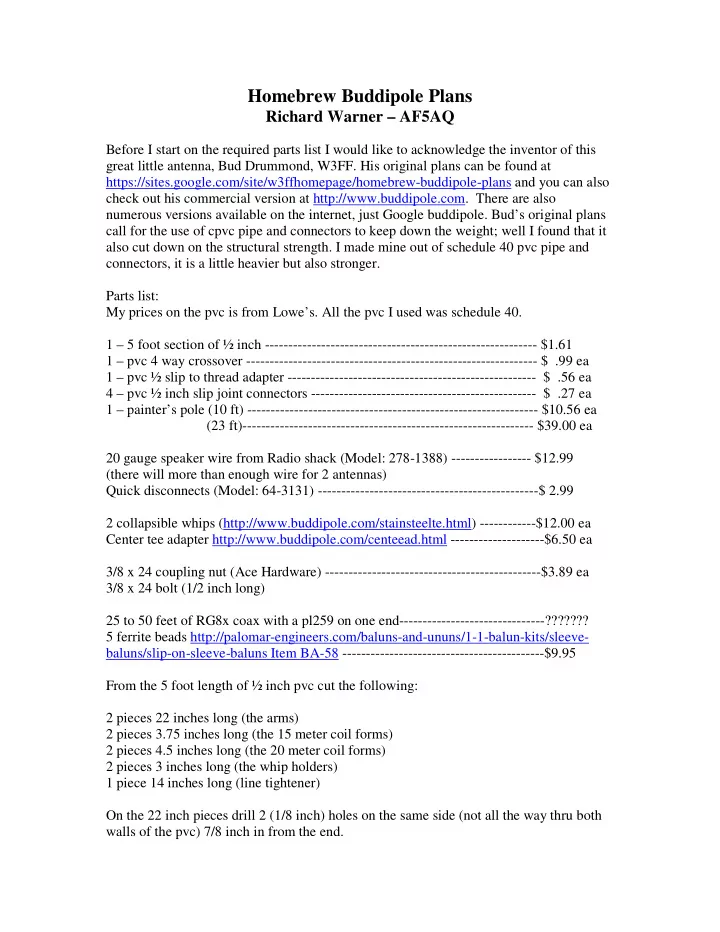
Homebrew Buddipole Plans Richard Warner AF5AQ Before I start on the required parts list I would like to acknowledge the inventor of this great little antenna, Bud Drummond, W3FF. His original plans can be found at


  1. Homebrew Buddipole Plans Richard Warner – AF5AQ Before I start on the required parts list I would like to acknowledge the inventor of this great little antenna, Bud Drummond, W3FF. His original plans can be found at https://sites.google.com/site/w3ffhomepage/homebrew-buddipole-plans and you can also check out his commercial version at http://www.buddipole.com. There are also numerous versions available on the internet, just Google buddipole. Bud’s original plans call for the use of cpvc pipe and connectors to keep down the weight; well I found that it also cut down on the structural strength. I made mine out of schedule 40 pvc pipe and connectors, it is a little heavier but also stronger. Parts list: My prices on the pvc is from Lowe’s. All the pvc I used was schedule 40. 1 – 5 foot section of ½ inch ---------------------------------------------------------- $1.61 1 – pvc 4 way crossover -------------------------------------------------------------- $ .99 ea 1 – pvc ½ slip to thread adapter ----------------------------------------------------- $ .56 ea 4 – pvc ½ inch slip joint connectors ------------------------------------------------ $ .27 ea 1 – painter’s pole (10 ft) -------------------------------------------------------------- $10.56 ea (23 ft)-------------------------------------------------------------- $39.00 ea 20 gauge speaker wire from Radio shack (Model: 278-1388) ----------------- $12.99 (there will more than enough wire for 2 antennas) Quick disconnects (Model: 64-3131) -----------------------------------------------$ 2.99 2 collapsible whips (http://www.buddipole.com/stainsteelte.html) ------------$12.00 ea Center tee adapter http://www.buddipole.com/centeead.html --------------------$6.50 ea 3/8 x 24 coupling nut (Ace Hardware) ----------------------------------------------$3.89 ea 3/8 x 24 bolt (1/2 inch long) 25 to 50 feet of RG8x coax with a pl259 on one end-------------------------------??????? 5 ferrite beads http://palomar-engineers.com/baluns-and-ununs/1-1-balun-kits/sleeve- baluns/slip-on-sleeve-baluns Item BA-58 -------------------------------------------$9.95 From the 5 foot length of ½ inch pvc cut the following: 2 pieces 22 inches long (the arms) 2 pieces 3.75 inches long (the 15 meter coil forms) 2 pieces 4.5 inches long (the 20 meter coil forms) 2 pieces 3 inches long (the whip holders) 1 piece 14 inches long (line tightener) On the 22 inch pieces drill 2 (1/8 inch) holes on the same side (not all the way thru both walls of the pvc) 7/8 inch in from the end.

  2. On the 3.75 inch pieces drill a 1/8 inch hole 7/8 inch in from one end and then another ¾ inch from the one you just drilled. These holes should be all the way thru the pvc pipe. On the 4.5 inch pieces drill a 1/8 inch hole 7/8 inch in from one end then another 2 inches from the one you just drilled. These holes should be all the way thru the pvc pipe. On the 3 inch pieces drill a 1/8 hole 7/8 inch in from one end. (not all the way thru both walls of the pvc) On the 14 inch piece cut a ¼ inch deep slot of one end of the piece. From the spool of 20 gauge speaker wire cut the following: (do no pull the wire apart until you cut it, that way you know that the mirror pieces are cut the same.) Lengths: 28 inches (for the arms) 26 inches (for the 15 meter coil) 70 inches (for the 20 meter coil) 6 inches (for the whip holder) Assembly: The arms: Feed the wire thru one of the holes into the pvc pipe, push it down the pipe, pull it thru the other hole. You should have a tail of about 3 inches on either end. Attach a female connector to one end and a male connector on the other end. Set aside. Coils: 15 Meter coil: Using the 3.75 inch piece of pvc, feed one end of the 26 inch piece of wire thru both holes that are 7/8 inch from end until you have 3 inches thru. Take the long end and wrap it 5 times around the coil then push the end thru the other holes. You should have about 3 inches sticking out. Put a female connector on one end and a male connector on the other end. Wrap the coil in electrical tape. 20 Meter coil: Using the 4.5 inch piece of pvc, feed one end of the 70 inch piece of wire thru both holes that are 7/8 inch from end until you have 3 inches thru. Take the long end and wrap it 20 times around the coil then push the end thru the other holes. You should have about 3 inches sticking out. Put a female connector on one end and a male connector on the other end. Wrap the coil in electrical tape. The whip holder: Insert a coupling nut into the end of the 3 inch pvc that you did not drill the hole in. Gently tap it in until it is flush with the pvc end. Insert one end of the 6 inch wire into the hole. Strip that end and put a ring lug on it, put the 3/8 x 24 bolt thru ring and insert it into the coupling nut. Screw a whip on. Set aside.

  3. Feedline: Slip the ferrite beads on the end of the coax without the pl259, then slip the heat shrink over the beads. Make sure about 6 inches of coax is sticking out. Heat the heat shrink. Strip 3 inches of the black outer covering off the coax. Separate the braid form the center core. Slip a short piece of heat shrink over the braid. Attach the correct connectors to the center and braid. If you do not want to buy the kit from Palomar Engineering you can also just coil up about 4 loops of coax about 6 inches in diameter and tape them. Assembling the antenna: First, put the 4 way connector on your mast of choice. Push an arm on either side. Put on a slip coupler and push on the coil of choice. Then add another slip coupler and push on the whip holder. Attach your feed line. Tuning: Move the telescoping sections of the whip in and out (both whips) until the SWR is good. Remember that a dipole needs to be elevated at least a quarter wavelength above ground. For 10 meters this would be about 8 feet, 15 meters is about 11 feet, and 20 meters is about 17 feet. My tuning was as follows: 10 meters – no coil – first 5 whip sections 15 meters – small coil – 5 and 2/3 whip sections 20 meters – large coil – 5 and ¼ whip sections Optional vertical antenna setup: Insert one of the coils in the top hole on the tee connector. Attach one of the whip holders to that. Attach center conductor of feedline to the whip holder. Get a ½ inch pvc plug ($.26 at Lowe’s), drill a 1/8 hole all the way thru it. Cut a piece of wire about 18 feet long (this will give an adequate counterpoise for up to 20 meters). Feed one end of the wire thru the hole you drilled in the plug put a connector on it. Tie a line on the other end of the wire. To use, push plug into one of the side holes on the 4 way. Unroll the right amount of wire needed for whichever band you are working on. A drawing of the homebrew Buddipole is below.

Download Presentation
Download Policy: The content available on the website is offered to you 'AS IS' for your personal information and use only. It cannot be commercialized, licensed, or distributed on other websites without prior consent from the author. To download a presentation, simply click this link. If you encounter any difficulties during the download process, it's possible that the publisher has removed the file from their server.

Recommend


More recommend