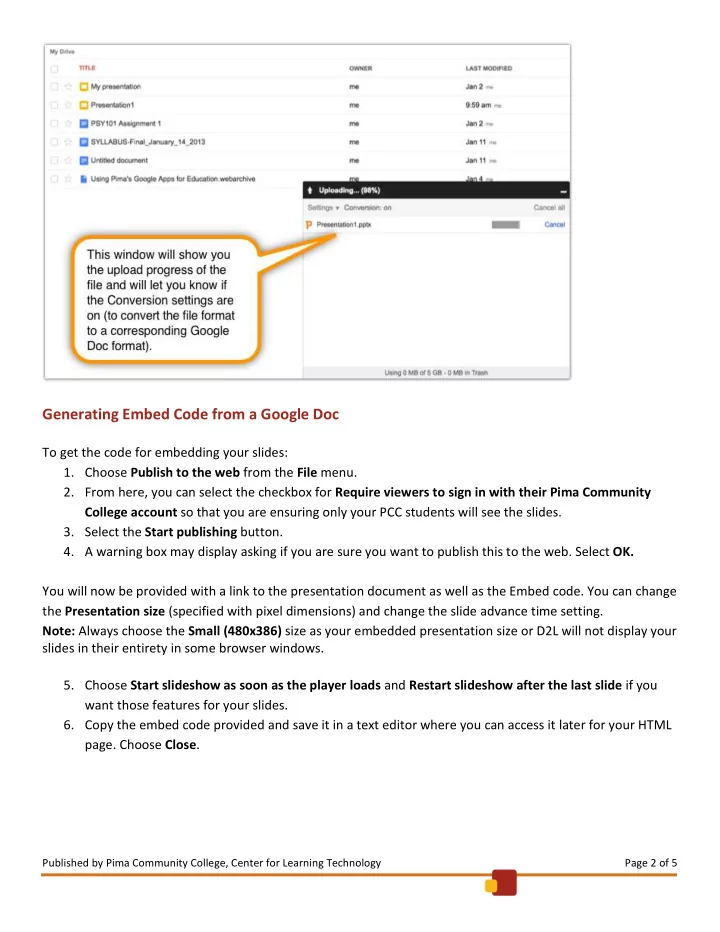
generating embed code from a google doc
play

Generating Embed Code from a Google Doc To get the code for - PDF document

Generating Embed Code from a Google Doc To get the code for embedding your slides: 1. Choose Publish to the web from the File menu. 2. From here, you can select the checkbox for Require viewers to sign in with their Pima Community College account


  1. Generating Embed Code from a Google Doc To get the code for embedding your slides: 1. Choose Publish to the web from the File menu. 2. From here, you can select the checkbox for Require viewers to sign in with their Pima Community College account so that you are ensuring only your PCC students will see the slides. 3. Select the Start publishing button. 4. A warning box may display asking if you are sure you want to publish this to the web. Select OK. You will now be provided with a link to the presentation document as well as the Embed code. You can change the Presentation size (specified with pixel dimensions) and change the slide advance time setting. Note: Always choose the Small (480x386) size as your embedded presentation size or D2L will not display your slides in their entirety in some browser windows. 5. Choose Start slideshow as soon as the player loads and Restart slideshow after the last slide if you want those features for your slides. 6. Copy the embed code provided and save it in a text editor where you can access it later for your HTML page. Choose Close . Published by Pima Community College, Center for Learning Technology Page 2 of 5

  2. Your embed code will look similar to the following: <iframe src="https://docs.google.com/a/mail.pima.edu/presentation/d/1imPKh6l- XUMIOEPdFQFa4tg5YkLx3l_FULiCvglUQtY/embed?start=false&loop=false&delayms=3000" frameborder="0" width="480" height="389" allowfullscreen="true" mozallowfullscreen="true" webkitallowfullscreen="true"></iframe> Placing Embed Code on an HTML Page In your D2L course, follow these steps to create a new HTML page: 1. Select Content from the navbar. 2. Select New Topic . 3. Select Create New File . 4. Choose a module to place your new page in, or select [add module] to create a new module. 5. Enter your page’s Title and File Name . 6. Select Choose destination to change the location of your new page in D2L’s Manage Files area. 7. Place your cursor in the Content window and select the Insert Stuff icon. 8. From the left column, select Enter Embed Code . 9. An empty box will appear where you can paste the embed code you got from Google Docs. Select Next . Published by Pima Community College, Center for Learning Technology Page 3 of 5

  3. 10. You will probably get a message saying Content Blocked . Select Allow . 11. Select Insert . 12. You should now see your presentation in the Content window. Select Save . 13. At this point you should add this presentation in an additional format for accessibility. If you have already saved it as a plain text or pdf document you can now use the Insert Stuff icon again to include a link to an additional file for your students within your presentation content page – be sure to name the link clearly. Note: The presentation will prompt your students to enter their MyPima login credentials in order to view it if it is shared to People at Pima Community College (which is explained in the following section). Sharing Your Slides with Students To share your presentation with your students: 1. In Google Drive, go to the File menu and select Share… 2. The default setting for access is Private . Select Change… to change this. 3. From the Share settings window, choose how you want to save this presentation. a. For example, selecting People at Pima Community College with the link will allow anyone at Pima who you have shared the presentation link with to view it. b. Next to the line showing Access ensure that Can view is selected to allow the people who visit your presentation to view it only (the other options are can comment and can edit) . 4. Choose Save . Published by Pima Community College, Center for Learning Technology Page 4 of 5

  4. 5. Enter the email addresses of your students under Add people (use the Choose from contacts link to do this quickly) and decide if you want to share the direct link of the presentation with them via email. 6. Select Share & save . Note: By providing the link that appears in the Share settings window to students, they will have an alternative way to access the presentation in case they have trouble viewing the embedded file in D2L. Providing Fully Accessible Content: Alternative Formats You Can Provide Your Students To provide additional formats for your students, you should download your presentation as a PDF or as plain text and then include a link to it in the same page you embed your presentation into in D2L. Note: Any text to speech software can easily access Plain Text files. To download a PDF: 1. Select File and choose Download as… 2. Select PDF Document (.pdf). The file will download to your computer. To download as plain text: 1. Select File and choose Download as… 2. Select Plain Text (.txt). The file will download to your computer. Published by Pima Community College, Center for Learning Technology Page 5 of 5

Download Presentation
Download Policy: The content available on the website is offered to you 'AS IS' for your personal information and use only. It cannot be commercialized, licensed, or distributed on other websites without prior consent from the author. To download a presentation, simply click this link. If you encounter any difficulties during the download process, it's possible that the publisher has removed the file from their server.

Recommend


More recommend