follow the brief presentation instructions sharing
play

Follow the brief presentation instructions Sharing PowerPoint slides - PDF document

Follow the brief presentation instructions Sharing PowerPoint slides is an effective way to get your ideas across, and make your presentation memorable by focusing on bulleted items and avoiding too many details. Upload your PowerPoint


  1. Follow the brief presentation instructions Sharing PowerPoint slides is an effective way to get your ideas across, and make your presentation memorable by focusing on bulleted items and avoiding too many details. Upload your PowerPoint presentation It’s a good idea to upload your presentation in advance and practice with the presentation tools so you’re comfortable using them during the meeting. 
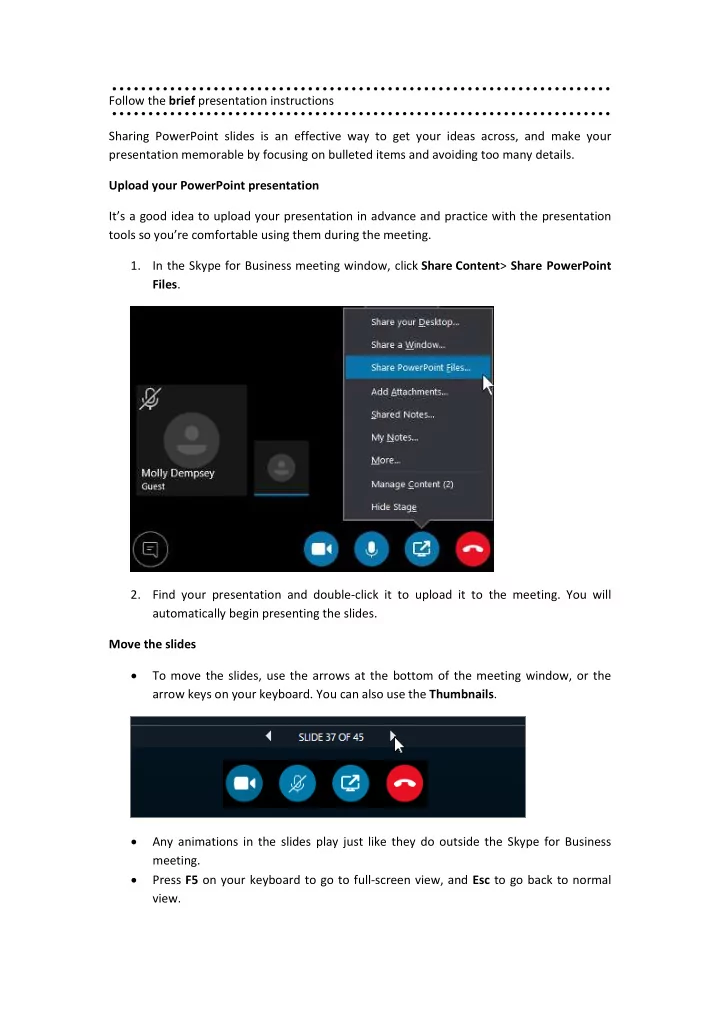
1. In the Skype for Business meeting window, click Share Content > Share PowerPoint Files . 2. Find your presentation and double-click it to upload it to the meeting. You will automatically begin presenting the slides. Move the slides • To move the slides, use the arrows at the bottom of the meeting window, or the arrow keys on your keyboard. You can also use the Thumbnails . • Any animations in the slides play just like they do outside the Skype for Business meeting. • Press F5 on your keyboard to go to full-screen view, and Esc to go back to normal view.

  2. See your notes • Click Notes to see your presenter notes (visible only to you). Play a video • If a slide contains a video, hover the cursor over the slide to unhide the video controls, such as Play , Pause , and volume controls. The audio plays for participants who used computer audio when joining. Use the annotation tools • By using the annotation tools you can visually focus on various points in your presentation or brainstorm with the participants. Annotating a presentation doesn’t change the actual file. However, you can save a new copy with the annotations if you want. • Click the Annotations button on the right side of the slide to unhide the tools to draw, stamp, highlight, and more. • Laser Pointer: Drag the pointer across the slide. • Select and Type: Select an area where you can type and change font, color, and size. • Pen: Draw freehand. • Highlighter: Highlight a specific area of the current slide. • Eraser: Remove specific annotation that you chose. • Stamp: Insert a stamp on the displayed slide: Arrow, Check, or X. • Shape: Draw shapes such as lines, arrows, squares. • Insert Picture: Insert an image on the slide from your computer. • Delete Selected Annotations: Remove the annotations that you’ve selected.

  3. • More Options: provides options to select the annotation, undo, redo, copy, cut, paste, paste as image, save as, delete all annotations from the page, and send to OneNote. View privately or take over as presenter • Presenters can take turns sharing the slides in a meeting. While one person is presenting, another can skip ahead to a specific slide and then return to the current view. • To view the slides privately, click the arrows at the bottom of the meeting to move through the slides. This won’t interrupt the meeting, and you’ll be notified that you are viewing the meeting privately. • To go back to the current view, click Return to Presenter’s View to synchronize your view with the active presenter. • To present, click Take Over as Presenter to take control of the presentation. Be aware that the meeting automatically switches to your view. • When you have finished your presentation, click Stop Sharing .

Download Presentation
Download Policy: The content available on the website is offered to you 'AS IS' for your personal information and use only. It cannot be commercialized, licensed, or distributed on other websites without prior consent from the author. To download a presentation, simply click this link. If you encounter any difficulties during the download process, it's possible that the publisher has removed the file from their server.

Recommend


More recommend