do hips yourself
play

Do HiPS yourself! HiPS tutorial ASTERICS Heidelberg - 17 june - PDF document

Do HiPS yourself! HiPS tutorial ASTERICS Heidelberg - 17 june 2016 P. Fernique & G. Landais At the end of this tutorial you will be able to create, use and publish a Hierarchical Progressive Survey (HiPS) built from your own


  1. Do HiPS yourself! HiPS tutorial – ASTERICS Heidelberg - 17 june 2016 – P. Fernique & G. Landais At the end of this tutorial you will be able to create, use and publish a Hierarchical Progressive Survey (HiPS) built from your own collection of astronomical images. 1 Prerequise You need to have on your machine : Aladin Desktop tool & a collection of FITS images. 1. Install the last Aladin Desktop beta version (and java) on your machine => http://aladin.unistra.fr/AladinDesktop/ 2. Copy on your machine a small collection of FITS images, uncompressed, and astrometrically calibrated (WCS header recognized by Aladin). For instance, use one of these collections : => HalphaNorth (65MB): http://aladin.unistra.fr/ASTERICS/HalphaNorth.tar (65MB) => SUMSS – Galactic plane: http://aladin.unistra.fr/ASTERICS/SUMSGal.tar (679MB) (also available on http://docs.g-vo.org/hips/ server) 2 Explore the already existing HiPS Presently, there are about 300 HiPS available, in various wavelengths and resolutions, in grey levels or color, in full pixel values, or in preview mode (cf : http://aladin.unistra.fr/hips/list). Aladin Desktop allows one to access and display them : 1. Launch Aladin and use the menu “ File → Open → HiPS ”. Load the “ Image → Optjcal → DSS → DSS2 Red ” or any other HiPS that you want to explore. Do not hesitate to change the celestial reference ( Frame ICRS → “Gal” ) or adjust the contrast (button “ Pixel ”) or change the drawing projection (button “ Prop ” SINUS → AITOFF ). 
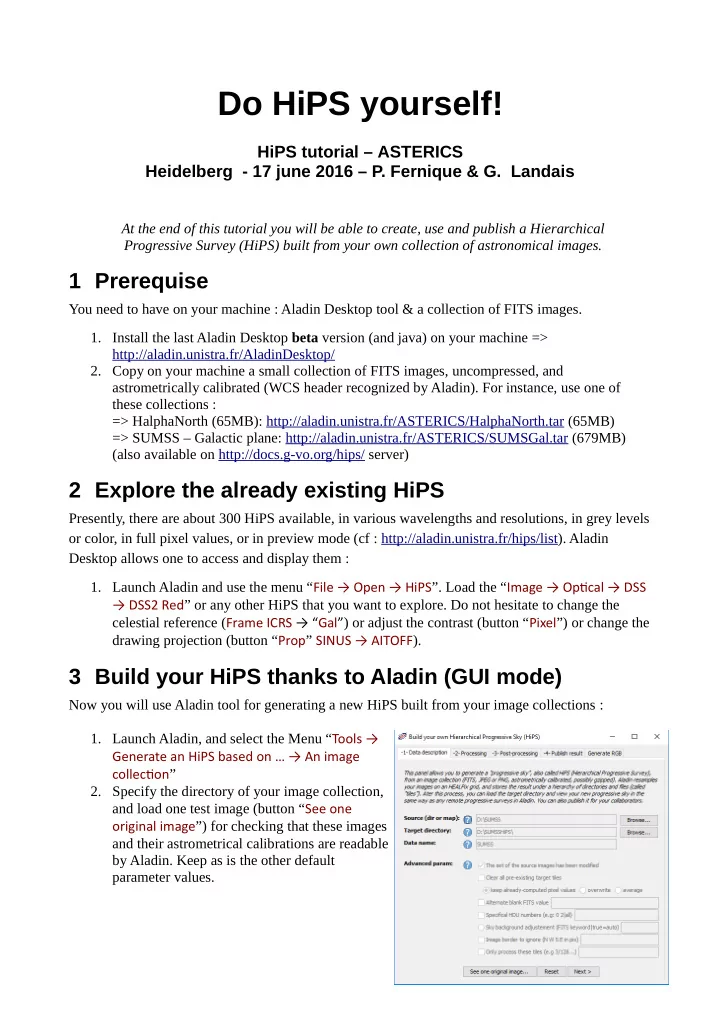
3 Build your HiPS thanks to Aladin (GUI mode) Now you will use Aladin tool for generating a new HiPS built from your image collections : 1. Launch Aladin, and select the Menu “ Tools → Generate an HiPS based on … → An image collectjon ” 2. Specify the directory of your image collection, and load one test image (button “ See one original image ”) for checking that these images and their astrometrical calibrations are readable by Aladin. Keep as is the other default parameter values.

  2. 3. Move into the 2nd tab (button “ Next > ”), and launch the generation process (keep as is the other default parameters) … and take a cafe… During the generation process, Aladin display the evolution of the HiPS (unzoom a little to see it). 4. At the end of the process, you will have created a HiPS in a target directory. Take time to have a look to the HiPS structure. As you can see, it is just a hierarchy of directories and files. Each file represent a “HiPS tile”. Presently, you have only generated the FITS tiles (containing the original dynamic of the pixels). => explore the target directory : in the example : D:\SUMSSHiPS 5. Move into the 3nd tab, and launch the generation of the compressed tiles. Select JPEG format for a faster computation. At the end of the process, you will see that each tile is now provided both in FITS and JPEG format. 6. Check the result thanks to Aladin Desktop and/or Aladin Lite. In Aladin Desktop, reset the stack ( Edit → Delete all ), and clic-and-drag the HiPS target directory name into Aladin panel. For checking with Aladin Lite, just click on the “ index.html ” file in the HiPS directory. If your HiPS is fine, you are ready to publish it! 4 (optional) Redo the same thing in batch mode Alternatively, a HiPS can also be generated via a shell command. 1. For instance, generate the same HiPS via this command : => java -Xmx1024m -jar AladinBeta.jar -hipsgen in= D:\SUMSS out=D:\HiPSbis 2. The script command supports more parameters than the GUI form. Have a look in the in- line documentation => java -jar AladinBeta.jar -hipsgen -h You can also consult this document http://aladin.unistra.fr/hips/HipsIn10Steps.gml which helps a lot for solving specific mosaicking issues (background subtraction, overlay method, mask on valid pixels, ...) 5 Distribute and use your HiPS A HiPS publication just requires an HTTP server, for instance Apache. All your users will be able to load it in Aladin Desktop or any other HiPS aware clients. You will be able also to insert your HiPS in a Web page thanks to Aladin Lite. 1. For installing your HiPS, just copy the HiPS target directory inside the HTTP server page distribution. And that's all. If you do not have a HTTP server on your local machine, skip

  3. this step and use this URL => http://aladin.unistra.fr/ASTERICS/SUMSS-HiPS 2. Your users can now use this HTTP HiPS via Aladin Desktop just by loading the base URL of your HiPS. 3. For providing your HiPS embedded in a Web page, have a look to the HTML code example provided in the “ index.html ” file (generated at the root of your HiPS), and try to use the same <javascript> tags for incorporating Aladin Lite into one of your web page. You can also use this form for helping you => http://aladin.unistra.fr/AladinLite/doc 6 Publish you HiPS In the case that you want to see your HiPS in the menu of HiPS aware clients such as Aladin, you need to publish officially your HiPS. However, take care that the publication method of a HiPS is still in discussion at the IVOA level and this solution may still evolve a little bit. 1. First of all, you have to check the metadata associated to your HiPS by editing the file “ propertjes ” at the root of your HiPS. 2. After that, you have to create your “HiPS list”. It is a short ASCII file that you will publish by your HTTP server, providing at least these 4 keywords per HiPS that you distribute: creator_did = ivo://aValid/IVOID hips_release_date = 2014-02-19T12:25Z hips_service_url = http:// your.host/your/hips hips_status = public master clonable creator_did = etc ... When HiPS will be fully IVOA standardized, you will have to declare your HiPS server in the VO registry specifying the URL of your HiPS list. In the mean time, you can provide this URL to the CDS which does the job for the community. Have a look of the HiPS lists of already declared HiPS servers => http://aladin.unistra.fr/hips/registry Tip : for helping you to generate and maintain your HiPS list, this small script does the job for you => http://aladin.unistra.fr/hips/perl_hipslist. You can install it as a CGI (it will be run by the httpd server), or launch it manually each time you add a new HiPS, or change meta data.

  4. 7 To go further with HiPS... During the HiPS generation, two additional data products are automatically generated : 1. The coverage of the pixels as a MultiOrder Coverage map (cf. the MOC tutorial). It is stored in the file “Moc.fits” in the HiPS root directory. ; 2. A list of the links to the original files which have been used for generated the HiPS (= the progenitors). Use the “ Prop .” button to access them. Tip: If you want to replace these default local path access by remote URLs, allowing your users to have an easy access to your original images, edit the “metadata.xml” file in the “HpxFinder” directory of your HiPS. and adjust the associated VOTable links.

Download Presentation
Download Policy: The content available on the website is offered to you 'AS IS' for your personal information and use only. It cannot be commercialized, licensed, or distributed on other websites without prior consent from the author. To download a presentation, simply click this link. If you encounter any difficulties during the download process, it's possible that the publisher has removed the file from their server.

Recommend


More recommend